| XLCubed is now FluenceXL. The new wiki can be found here: https://help.fluencexl.com/ |
XLCubed Web Edition Installation Guide/Version 6.1
Contents
[hide]- 1 Overview
- 2 Installation Prerequisites
- 3 Setting up the XLCubed Web Edition application manually
- 4 Analysis Services Security Setup and Options
- 5 XLCubed Web Security
- 6 Accessing XLCubed Web reports from SharePoint and other portals
- 7 System Configuration Settings
- 8 Server specification
- 9 Application Usage
- 10 See Also
- 11 External Links
Overview
To install XLCubed Web:
- Run the setup program while logged onto the server as a user with administrator permissions
- Once installed, copy the provided license key (xl3web.license) into the website folder, which is by default: C:\Inetpub\wwwroot\XLCubedWeb
- When installed, the application is accessed by navigating to http://<yourservername>/XLCubedWeb
- XLCubedWeb is the default website name during installation, but can be changed as required during the installation process
- Please note version 6 will not upgrade existing version 5 installations: it will install as a separate product
Installation Prerequisites
Server Requirements:
- Windows 2000 Server or above
- Internet Information Services (IIS) 5.1 or above
- Microsoft .NET Framework version 4.0
Client Requirements:
- Internet Explorer 7.0 or above
- Google Chrome 5.0 or above
- Mozilla Firefox 3.6 or above
The installation will automatically download and install any required Microsoft redistributables. If desired or if Internet access is restricted, these can be downloaded and installed manually before running the XLCubed setup process. A list is available here.
Setting up the XLCubed Web Edition application manually
This step is usually not required, as the setup program will create the web application for you. It may be necessary if:
- During the setup process, the Add XLCubed Web Edition to IIS checkbox was unselected
- Your web server is set up in a non-standard configuration, especially where the Default Web Site has been modified
- You wish to create the web application yourself for whatever reason
Note that in the non-standard configuration, you may receive the following error message from the setup program: Failed while processing WebVirtualDirs. (-2147024894)
In any of these cases, the setup program will have copied the application files to the web server, but you will have to create the site yourself. To do this:
- Open Internet Information Services Manager (inetmgr.exe)
- Under the Application Pools node, ensure that the XLCubed application pool has been set up. It must be configured to use v4.0 of the .NET Framework and use the Classic pipeline mode.
- Under the Sites node, open the website in which XLCubed Web Edition should be made available (usually the Default Web Site).
- Usually the XLCubedWeb Virtual Directory will already exist within the website. If this is the case, then right-click on it and select Convert to Application. If not, right-click on the website instead and select Add Application...
- In the Add Application dialog, ensure that the XLCubed application pool is selected and, if necessary, choose the correct path.
This will set up the application's web site. Further security setup and other configuration will likely be necessary. Information can be found below.
Analysis Services Security Setup and Options
Cube-based security options
XLCubed Web Edition and Analysis Services on same server
Either basic authentication or integrated security may be enforced by IIS.
Windows Authentication
IIS Settings
Depending on your IIS version, take the following steps:
IIS 5/6
Right click the XLCubedWeb directory and select "Properties" Select the "Directory Security" tab Ensure that "Integrated Windows authentication" is checked and all others are not.

IIS 7/7.5
Select the XLCubedWeb directory and open the "Authentication" section.

Ensure "ASP.NET Impersonation" and "Windows Authentication" are enabled, and others are disabled.

If you do not have these options you must add them from Control Panel -> Programs -> Turn Windows features on or off
Web.config
You will need to change the web.config file to include entries for all bindings. These entries are dependent on the authentication mode (Basic, Windows or Anonymous) and whether or not you are using HTTPS.
Please note that when using HTTPS the security mode should be equal to Transport.
| Authentication | Using HTTPS? | web.config – on all bindings |
|---|---|---|
| Windows | Yes | <security mode="Transport"> <transport clientCredentialType="Windows"/> </security> |
| Windows | No | <security mode="TransportCredentialOnly"> <transport clientCredentialType="Windows"/> </security> |
Multiple IIS sites
If you are using multiple sites in IIS you need to add the following to web.config in section <serviceHostingEnvironment>
multipleSiteBindingsEnabled="true"
Basic Authentication
IIS Settings
Depending on your IIS version, take the following steps:
IIS 5/6
Right click the XLCubedWeb directory and select "Properties" Select the "Directory Security" tab Ensure that "Basic authentication" is checked and all others are not.

IIS 7/7.5
Select the XLCubedWeb directory and open the "Authentication" section.
Ensure "ASP.NET Impersonation" and "Basic Authentication" are enabled, and others are disabled.

Web.config
You will need to change the web.config file to include entries for all bindings. These entries are dependent on the authentication mode (Basic, Windows or Anonymous) and whether or not you are using HTTPS.
Please note that when using HTTPS the security mode should be equal to Transport.
| Authentication | Using HTTPS? | web.config – on all bindings |
|---|---|---|
| Basic | Yes | <security mode="Transport"> <transport clientCredentialType="Basic"/> </security> |
| Basic | No | <security mode="TransportCredentialOnly"> <transport clientCredentialType="Basic"/> </security> |
Multiple IIS sites
If you are using multiple sites in IIS you need to add the following to web.config in section <serviceHostingEnvironment>
multipleSiteBindingsEnabled="true"
Anonymous Authentication
IIS Settings
Depending on your IIS version, take the following steps:
IIS 5/6
Right click the XLCubedWeb directory and select "Properties" Select the "Directory Security" tab Ensure that "Enable anonymous access" is checked and all others are not.

IIS 7/7.5
Select the XLCubedWeb directory and open the "Authentication" section.
Ensure "ASP.NET Impersonation" and "Anonymous Authentication" are enabled, and others are disabled.

If you do not have these options you must add them from Control Panel -> Programs -> Turn Windows features on or off
Web.config
You will need to change the web.config file to include entries for all bindings. These entries are dependent on the authentication mode (Basic, Windows or Anonymous) and whether or not you are using HTTPS.
Please note that when using HTTPS the security mode should be equal to Transport.
| Authentication | Using HTTPS? | web.config – on all bindings |
|---|---|---|
| Anonymous | Yes | <security mode="Transport"> <transport clientCredentialType="None"/> </security> |
| Anonymous | No | <security mode="TransportCredentialOnly"> <transport clientCredentialType="None"/> </security> |
XLCubed Web Edition and Analysis Services on separate servers
Either basic authentication or integrated security may be enforced by IIS.
Basic authentication
Make same changes as for XLCubed Web Edition and Analysis Services are on same server.
Integrated Security
Make same changes as for XLCubed Web Edition and Analysis Services are on same server.
In addition to enable integrated security in this situation, the network must be set up to support the Kerberos authentication protocol to enable the security credentials to be passed on from the web server (where they were received from the originating client) to the OLAP server. This is due to a limitation in the NTLM (LanManager) protocol which does not support the delegation of security credentials further than one-hop.
Anonymous authentication
Make same changes as for XLCubed Web Edition and Analysis Services are on same server.
XLCubed Web Security
During the installation XLCubedWeb sets up Read/Write permissions on the following folders.
- XLCubedWeb\Repository (handles repository and publish / preview)
- XLCubedWeb\Temp (handles save to excel)
Functional User Permissions
Access to the application, and the type of access is controlled by two files located in:
C:\Inetpub\wwwroot\XLCubedWeb\Xml\Security
To enable or disable user or group access to the Web Edition, enable or disable read access for the relevant user or group to:
system.xml
'Ad hoc' access gives users the ability to build their own report from scratch. This access is controlled via the adhoc.xml file. To restrict users to be able to view only pre-published reports, revoke access to:
adhoc.xml
Repository Management and Security – User Folders
The repository, visible in the left hand pane of the web application, is simply a folder on the Web Server within which additional subfolders can be added. All published reports are held within the repository folder, or subfolders within it. The folder location will by default be:
C:\Inetpub\wwwroot\XLCubedWeb\Repository
Additional folders can be added as required, at the level immediately beneath the Repository folder itself, for example one folder per user group. These are added on the server itself, thus lending itself to maintenance of the structure by the IT function, or a designated user(s).
Windows permissions determine which folders are visible within the web application to any given user, e.g. can be configured such that the 'Sales' function cannot see the 'Finance' function folder and vice versa. This is all handled transparently by the application, and set at the Windows folder level permissions level. The same logic is true of read/write vs. a read-only split between user groups.
Note that every user has a 'My Reports' folder, which is the equivalent of 'My Documents' in Windows, and is only accessible by the individual user. These are held in the location below:
C:\Inetpub\wwwroot\XLCubedWeb\Repository\__userfolders__
Published Connections
When a user publishes a connection to XLCubed Web, which may contain custom calculations, etc, they are published to:
C:\Inetpub\wwwroot\XLCubedWebv6\Repository\__xlcubed__\__connections__\Published Connections
or to subfolders which have been created within this.
Published Favourites When a user published a report favourite to the web, they are published to:
C:\inetpub\wwwroot\XLCubedWebv6\Repository\__xlcubed__\__grids__\Published Favourites
XLCubed Web reports can be accessed either through the Web Edition homepage, or accessed directly by URL within other portals.
To get the URL for a specific report, in the homepage of XLCubed Web:
- Click on the View parameters icon:


- Then press the Get Url button:
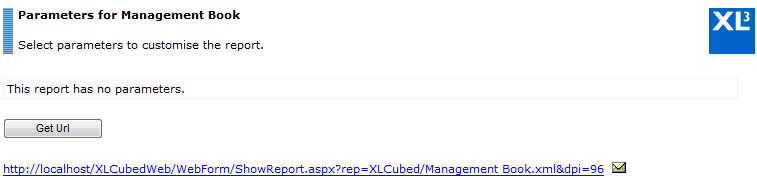

The provided URL can be used to embed the report within other portals and frames as required. In the case of SharePoint, the URL is used within a sitelink web part.
Additional configuration options accessible as suffixes on the URL are:
| HorizontalScrollbar | true/false |
| VerticalScrollbar | true/false |
| SheetTabs | true/false |
| Toolbar | true/false |
| DefaultTargetFrame | text |
For example, for the report above, to include the toolbar in the rendered version, the URL would become:
http://localhost/XLCubedWeb/WebForm/ShowReport.aspx?rep=XLCubed/Management Book.xml&dpi=96&Toolbar=True
System Configuration Settings
Behavioural Configuration
The web.config file held within the XLCubedWeb folder determines various behavioural aspects of the product. The following settings are held within the <appSettings> section.
| LogErrors | write errors to Error.log file |
| LogPerformance | for debug only |
| ShowErrorMessages | show detailed error messages or just a reference to the log file |
| DefaultChartSeries | default number of series to chart on an ad-hoc report |
| MaxChartSeries | maximum number of series to chart on an ad-hoc report |
| DisplaySystemMemProps | show system member properties available for selection |
| DrillthroughDefaultMaxRows | default maximum rows on a drillthrough |
| DrillthroughAbsoluteMaxRows | maximum permitted rows on a drillthrough |
| RepositioryRootUNC | UNC path to a share containing the repository so that users can edit it. For example, \\XL3WebServer\Repository |
| ClearLevelsMovedToFilters | Where an entire level is selected on an axis (potentially a large number of members), and is dragged onto the slicer, the selection is changed to the default member (Typically 'All'). This is to prevent users accidentally creating a very slow running query by individually aggregating all the members dragged to the slicer |
| DefaultCulture | Backup culture where it cannot be retrieved from the browser |
| QueryActiveDirectory | Used to display the user name on homepage |
| WritebackTimeout | Writeback timeout in milliseconds |
| PdfConverterUserName | see PDF Printing - Configuration |
| PdfConverterPassword | see PDF Printing - Configuration |
| DocumentDomain | Used when embedding XLCubed within an iframe on a different server |
PDF Printing - Configuration
XLCubed Web incorporates PDF printing. To enable this, a user id and password must be specified in the web.config file located in the website folder. The settings which need to be edited are:
<add key="PdfConverterUserName" value="servername\username"/>
<add key="PdfConverterPassword" value="password"/>
Note the user name should contain the machine name also. The specified user only requires read access to the XLCubed Web website itself. It is suggested that a specific local id is set up on the server, with low level access specifically for this purpose.
The print process also requires end user read access to the temporary internet files folder on the web server. This is needed because CSS files needed to render the PDF are stored here. To enable that:
- Open C:\Windows\Temp or the folder location that %temp% points to.
- There should be a folder called Temporary Internet Files. If not, open the Tools > Folder options > View options dialog, and unselect the Hide protected operating system files option
- Right click the Temporary Internet Files folder and give the end users read access to it
In some configurations, either an empty PDF file with the error message Navigation to the webpage was cancelled, or no PDF file will be sent to the web browser, and the error.log will be updated with the error message: Unable to render HTML. No MSHTML document is available. In this case, the web.config file needs to be edited, setting the PdfHostWebBrowser value to false:
<add key="PdfHostWebBrowser" value="false"/>
The PDF print process uses a server-based process to re-open the HTML from the current webpage, so doesn't re-query the cube. This requires that the Web server can access the website using the identical URL to an end user. Where the web site uses integrated Authentication and has a name that is mapped to the local loopback address, you can receive a 401.1 error on trying to print. Microsoft has released an article, which outlines how to resolve this: Microsoft Knowledge Base article 896861.
Server specification
Recommended specification is dependent on the cube size and design, the number of users, and the pattern of usage. Having Analysis Services on the same machine will also have an impact.
As an absolute minimum we recommend:
- Memory: 2GB
- Processor: Dual Core 2.2 GHz
Application Usage
- Please refer to the help menu within the product for an overview of all functionality.